Official Luthiers Forum!

Owned and operated by Lance Kragenbrink
It is currently Sat Nov 30, 2024 3:54 pm


All times are UTC - 5 hours


Post new topic Reply to topic  [ 23 posts ] 
Author Message
PostPosted: Tue Aug 23, 2016 7:57 pm 
Hi
I'm brand new here
I hail from Vancouver BC Canada
I'm not a luthier per se but I did take Michael Dunn's(local luthier) course and built a classical a zillion years ago. Since then I've worked at Larrivee for a couple of years and play my own music professionally and now semi-professionally. I do most of my own guitar work and have recently added refrets to my repretoire. I also have a carpentry/woodworking background and I'm a hobbyist bowyer. whew!
I like bringing damaged or abused guitars back to life.

Anyway I have this early 80s Yamaha AE1200S archtop. I love archtops and have several. I picked this one up cheap off of ebay because somebody had been doing unkind things to it. Happily the gamble paid off and despite the unkind things it is a lovely sounding and great playing instrument.
It is a solid top, supposedly carved but just as likely pressed. It's easy to see the grain in the edge of the pickup holes. Somebody tried to plug one of the pickup holes with something that looks suspiciously like doorskin... the other pickup hole has been cut out a little to accommodate a P-90 style pickup. sigh.
I was contemplating plugging both holes with similarly grained spruce (from a half guitar top a luthier friend gave me) . I would probably put a small arched cross brace or two under each patch, extending crosswise between the two normal lengwise braces. It's a nicely made guitar, easily in my opinion equivilant to similar vintage Gibsons, if not better. I don't like humbuckers so I would go with some sort of surface mount(like hilotrons) or floating pickups(I have some kent armstrongs and Dearmonds)

is there a nice way to patch pickup holes, or should I bother?? The guiatr has a nice archtop acoustic tone as is but the hole patching(which looks like it includes some bondo like material) is pretty hideous

An idears??

here are some quick pictures, ignore the clamp I found a little crack in the top I was repairing


You do not have the required permissions to view the files attached to this post.


Top
  
 
PostPosted: Tue Aug 23, 2016 8:47 pm 
Offline
Koa
Koa

Joined: Wed Feb 17, 2016 8:54 am
Posts: 854
State: Texas
Country: United States
Focus: Repair
Welcome to the Forum!

Top patches are interesting jobs because they are easily messed up, as evidenced by this instrument. In this case the first thing I'd do is remove the bondo (that's a given) and see how much wood you actually have left underneath the mess.

Can you post a picture of the top from the inside? That might help you get some better suggestions on the repair.


Top
 Profile  
 
PostPosted: Tue Aug 23, 2016 11:39 pm 
Hi and thanks!
I don't use/own a cell phone(still holding out) and I don't have a special camera so I had to resort to taking a picture using an old makeup mirror
It gives an idea and shows largely what I expected
A piece cut to roughly fit the original humbucker cutout(I'm still baffled why companies have solid top guitars and then rout pickups into them!!??) and then glued in and smoothed out with some sort of goop/filler and finish. The patch is some sort of mystery wood, from the top the grain orientation is at right angles to the grain of the quarter sawn spruce top.
I believe the small raised bit of wood around the pickup hole is original

The original braces are intact and not cut into (yay Yamaha)

My rough plan would be to remove the nasty patch
clean up that hole and the other pickup hole
make the neck pickup hole more uniform
cut two patches with similar width grain
shape them to fit
make a brace to two for each patch that emulates the curvature of the arched top
glue in the little brace(or two) and then glue in the patch.
...I should say at this point that I do not have access to a spray booth or any such facilities
And color matching is one of my biggest stumbling blocks

I think the top is nitro as it reacted quite dramatically to the bubble wrap it was shipped in. I think it's been resprayed


You do not have the required permissions to view the files attached to this post.


Top
  
 
PostPosted: Wed Aug 24, 2016 8:20 am 
Offline
Koa
Koa

Joined: Wed Feb 17, 2016 8:54 am
Posts: 854
State: Texas
Country: United States
Focus: Repair
Good deal that the braces were not touched.

So before you do anything I'd swiss cheese out that ugly fill and get it somewhat able to work.

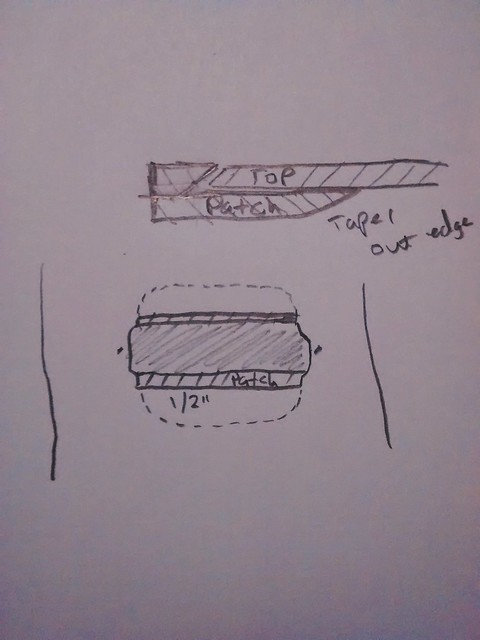
This is just a thought, but if you want to do fills I know for sure that putting a square edge end grain piece up against another square edge endgrain piece is not ideal, the joint wont be strong and it'll leave a really visible line. Scarf joints are much stronger and if you feather the edges out it'll be slightly easier to get it to blend into the remaining top, it will not be completely invisible though. Also I would want to add a tiny bit of strength to ensure that I don't break off my fills. I would not add a bunch of tiny little braces to reinforce the fills since they most likely would not add the strength you need and would be much more work.

Here's a quick sketch. The grain lines are not what you should do for your patch but rather just to distinguish it from the rest of the drawing. I've exaggerated the length in the drawing so you can get an idea of how it would work.
Image

The dotted lines represent how far under the top the taper would go, just a 1/2" under the edge (or as close as you can get to the top reinforcements) should be more than enough to strengthen the top. You could do this as one piece but I would do it as two pieces, cut the underside reinforcement first and then cut the scarf joint for the top. When you cut the scarf joint in the top make it a very slight angle (think 130 degrees). Once you have your fills glued in, plane it down flush and then proceed to cut it to the length you need to fill up the space in the top. Cut the length longer than you need so you can give yourself room for error.

I'm sure there's more than one way to do it but that method might work. I'm willing to be wrong however.


Top
 Profile  
 
PostPosted: Wed Aug 24, 2016 12:27 pm 
If I understand correctly you are suggesting a backing/supportive patch behind the actual patch.
There's a pair of little cross braces on either side of each pickup hole already
They're set in about 3/16 to 1/4 from the edge. They're about 1/4" wide and the same tall (by feel)
I'm happy to say that the longitudinal braces and these little guys are all nicely tapered which at least shows some attention to detail at the factory.

I'd have to go with a smaller overlap on the inside but that seems like a good idea
I guess I'd never get any acoustic benefit out of a patch anyway so I might as well go stronger

I must admit that the finish repair and colour matching baffles me a lot
Though I did do high end buffing at Larrivee but that mostly involved tiny repairs using super glue!
Any ideas how to go about this without a spray booth and fancy facilities?


Top
  
 
PostPosted: Wed Aug 24, 2016 12:51 pm 
Offline
Koa
Koa

Joined: Wed Feb 17, 2016 8:54 am
Posts: 854
State: Texas
Country: United States
Focus: Repair
A smaller overlap is fine. The idea is just to bridge the gap between your glued in extension and not just have a piece of wood hanging in mid air solely on the strength of the glue. The length of the overlap isn't as important as having it there and having a good strong scarf joint. The extra strength won't hurt anything.

I forgot to ask if you're looking to put the bridge pickup back in or if you're looking to convert it to a purely acoustic instrument? It'd be easier and more beneficial to put two pickups in it (in my opinion) rather than try to add two large grafts to the top that will always be visible.

For the finish I will not be able to help. Any finishing I do is shellac based and I don't think this would be appropriate in this case.


Top
 Profile  
 
PostPosted: Wed Aug 24, 2016 1:26 pm 
I would be making it a 2 pickup guitar.
That's what it was originally. But the pickups I like are usually surface mount. i though of putting some floating pickups on but unless I stripped it and refinished it a solid colour I'd never be able to hide the patch perfectly

Out of curiousity does anyone know the best ways of stripping finish (i think Nitro on the top, might be poly on the back and sides)
I heard heat gun


Top
  
 
PostPosted: Wed Aug 24, 2016 4:16 pm 
Offline
Contributing Member
Contributing Member
User avatar

Joined: Sun Mar 06, 2011 12:04 am
Posts: 5825
First name: Chris
Last Name: Pile
City: Wichita
State: Kansas
Country: Good old US of A
Focus: Repair
Status: Professional
Use chemical first - then heat gun. Try not to sand off finishes unless absolutely necessary - the guitar was already sanded at the factory....

_________________
"Act your age, not your shoe size" - Prince


Top
 Profile  
 
PostPosted: Thu Aug 25, 2016 12:26 am 
Cool! and Thanks. I wouldn't want to sand off a finish. though I'm very experienced at sanding I'm not keen on removing any top!!
Out of curiousity is anyone using water-based finishes on guitars and if so any recommedations
I've used Varathane Diamond finish on bows and they work great, polish up nice and you can do them without piles of gear etc etc.
I've heard water based lacquers mentioned


Top
  
 
PostPosted: Thu Aug 25, 2016 6:23 pm 
Offline
Contributing Member
Contributing Member
User avatar

Joined: Sat Feb 02, 2008 4:01 pm
Posts: 1104
Location: Winfield, IL.
Well, here's an unconventional idea.

Make a pick guard the covers the whole area and mount the pickups on that.

Steve


Top
 Profile  
 
PostPosted: Thu Aug 25, 2016 9:55 pm 
Like this?
http://guitars.com/archived-inventory/L ... R3502.html
or:

I was kind of hoping top mount hilotrons...25 years later and I'm still loving the pretty clean sounds they produce


You do not have the required permissions to view the files attached to this post.


Top
  
 
PostPosted: Thu Aug 25, 2016 10:19 pm 
Offline
Contributing Member
Contributing Member
User avatar

Joined: Sat Feb 02, 2008 4:01 pm
Posts: 1104
Location: Winfield, IL.
Now wouldn't that be a whole lot easier?
And much less invasive to an already abused guitar.

Steve


Top
 Profile  
 
PostPosted: Thu Aug 25, 2016 11:39 pm 
It is an interesting option. I'm not sure if I have pickups that would mount easily in that sort of configuration (though modifications could be done of course. And I do have a whole sheet of tortoiseshelltoiletseat pickguard material.
Hoever I find myself wanting to at least patch the hole under the P-90 .
I could just mount the original humbuckers, they came with the guitar and are coil tapped (Yamaha had cool ideas!)
I'm just not keen on the square humbucker look. They look okay on my other yamaha though


You do not have the required permissions to view the files attached to this post.


Top
  
 
PostPosted: Fri Aug 26, 2016 3:42 pm 
Offline
Koa
Koa

Joined: Thu Jan 24, 2008 2:13 am
Posts: 902
Location: Caves Beach, Australia
IMHO do not try to patch, even a pro would not be able to make it invisible, it will look bad.
Assuming you want to end up with a 2 pickup dogear setup, this is what I would do-
Dogears were often mounted on risers to give extra height to get them close to the strings.
These risers were made of plastic and were a little bigger than the pickup cover. Make a pair of these, wide enough to cover the humbucker rout.

oops missed your post about hilotrons, I know nothing about mounting those.


Top
 Profile  
 
PostPosted: Sat Aug 27, 2016 1:04 am 
HIlotrons are surface mounted with 2 screws though there's usually a small cutout to accommodate just the pole pieces
They have a bezel/surround that would cover both oopsys but the neck position humbucker/P-90 hole would have to be filled.
I did that with my gretsch tennessean I bought 30 years ago..somebody had routed it for a humbucker...ick!
Have a look at a Gretsch Tennessean or later double anniversary

Right now I'm vacillating between the original pickups with pushpull volume pots to access the coil split(single/humbucker)
which means cutting out the nasty patch.
Or filling the remaining hole and mounting the old gretsch hilotrons.

You're right about the patching, unless I refinished the guitar in a solid colour it would always be visible


Top
  
 
PostPosted: Sun Aug 28, 2016 12:33 am 
Well I decided to try the hilotrons first which meant making a patch for the neck hole. As you can see the pickup bezel will hide a multitube of sins and the pickup will hide the rest. My patch is a very tight fit..thank the old gods that I have a Larivee truss rod adjuster that I can use to tap it out through the F-hole. Annoyingly when cleaning up the holes edges a little I missed some filler goo in the two corners in the foreground. They are flush but you can see it's goo and not wood..grrr. Happily it'll be covered and at least my patch isn't as hideous as the previous one so for the time being I won't bother to make a new one. i think if I was to REALLY try and patch it I would make the entire hole uniforumly square and then bevel the edges as suggested by Dankirkland. I will be finishing it before I glue it in, just to seal the outside.


You do not have the required permissions to view the files attached to this post.


Top
  
 
PostPosted: Sun Aug 28, 2016 7:13 pm 
Offline
Koa
Koa

Joined: Wed Feb 17, 2016 8:54 am
Posts: 854
State: Texas
Country: United States
Focus: Repair
Not bad, the cover will hide most of the atrocities that have been committed, I'm assuming you're going to do the same to the bondo'd hole?


These users thanked the author DanKirkland for the post: Patrick Nelson (Tue Sep 06, 2016 10:23 pm)
Top
 Profile  
 
PostPosted: Sun Aug 28, 2016 11:52 pm 
Offline
Contributing Member
Contributing Member
User avatar

Joined: Sun Mar 06, 2011 12:04 am
Posts: 5825
First name: Chris
Last Name: Pile
City: Wichita
State: Kansas
Country: Good old US of A
Focus: Repair
Status: Professional
I'd call it a win.

_________________
"Act your age, not your shoe size" - Prince


Top
 Profile  
 
PostPosted: Mon Aug 29, 2016 2:37 am 
I ended up getting rid of the yuck in those two corners and making a better patch, finishing the top of it with several coats of thin hot stuff (fast). a light sand and steel wool so it's smooth and sealed. installed, then wired it up with the new pickup, old switch, new pots, custom ebony bridge top with bone saddle, etc, voila a Yamahestch..or a Gretschaha. Sounds good and plays excellent! These old Yamahas are nice instruments. I know the bigsby is a little heavy on the top but I use it all the time playing live. The Hilotrons are pretty transparent and articulate. nice low output pickups.. I'll probably make a new bridge top eventually as this was one I built for another archtop.I'm using the old base.


You do not have the required permissions to view the files attached to this post.


Top
  
 
PostPosted: Mon Aug 29, 2016 4:57 am 
Offline
Contributing Member
Contributing Member

Joined: Sat Feb 19, 2011 7:44 pm
Posts: 1225
Location: Andersonville
State: Tennessee
Country: USA
Focus: Build
Status: Professional
Nice, it's a player now :mrgreen:


Top
 Profile  
 
PostPosted: Tue Sep 06, 2016 3:21 pm 
Most of the way through carving a new one piece bridge for this Yamaha solid top
I make them for all my archtops. ebony with a bone saddle, properly fitted to the top.
This one is still in roughed out shape, fitted to the top , saddle cut and compensated, but much final shaping to be done. Lot's of 'meat' still to remove, I will probably cut a shallow notch to make two feet and then making it pretty!

I find this one piece bridges make a big difference, especially replacing tunematic style or metal bridges with lots of moving parts. My 64 Tennessean (which I've had for 25 years or so) became much better sounding when I replaced the original adjustable metal bar and ebony bottom bridge it originally came with. Better clarity, sustain, prettier high end and in general more top and bottom, and this on a plywood thin bodied electric archtop. It has been my main professional guitar for the intervening years. I would reccommend doing this to any archtop guitar.


You do not have the required permissions to view the files attached to this post.


Top
  
 
PostPosted: Tue Sep 06, 2016 4:21 pm 
Offline
Contributing Member
Contributing Member
User avatar

Joined: Tue Mar 01, 2011 1:32 pm
Posts: 3470
First name: Alex
Last Name: Kleon
City: Whitby
State: Ontario
Zip/Postal Code: L1N8X2
Country: Canada
Focus: Build
Status: Amateur
How do you adjust the bridge height, if needed?

Alex

_________________
"Indecision is the key to flexibility" .... Bumper sticker


Top
 Profile  
 
PostPosted: Tue Sep 06, 2016 4:28 pm 
As this is my guitar and I always use the same gauge strings 12-52.
When I'm making the saddle I start the action off high and adjust down to where I like it. After that no adjustment is necessary.
Just like an acoustic instrument. On an acoustic guitar one doesn't even consider an adjustable bridge. Same difference.

I think after 25 years of pro and semi pro playing, 1000s of gigs rehearsals and recording sessions. I might've replaced the bone saddle on my Tennessean once.


Top
  
 
Display posts from previous:  Sort by  
Post new topic Reply to topic  [ 23 posts ] 

All times are UTC - 5 hours


Who is online

Users browsing this forum: No registered users and 43 guests


You cannot post new topics in this forum
You cannot reply to topics in this forum
You cannot edit your posts in this forum
You cannot delete your posts in this forum
You cannot post attachments in this forum

Jump to:  
Powered by phpBB® Forum Software © phpBB Group
phpBB customization services by 2by2host.com